Configure SharePoint & OneDrive
Requirements
- The user setting up this connector must have the Global Admin role.
- PowerShell 7 (with the SharePoint PnP.PowerShell module, v2.3.0+, installed)
Process
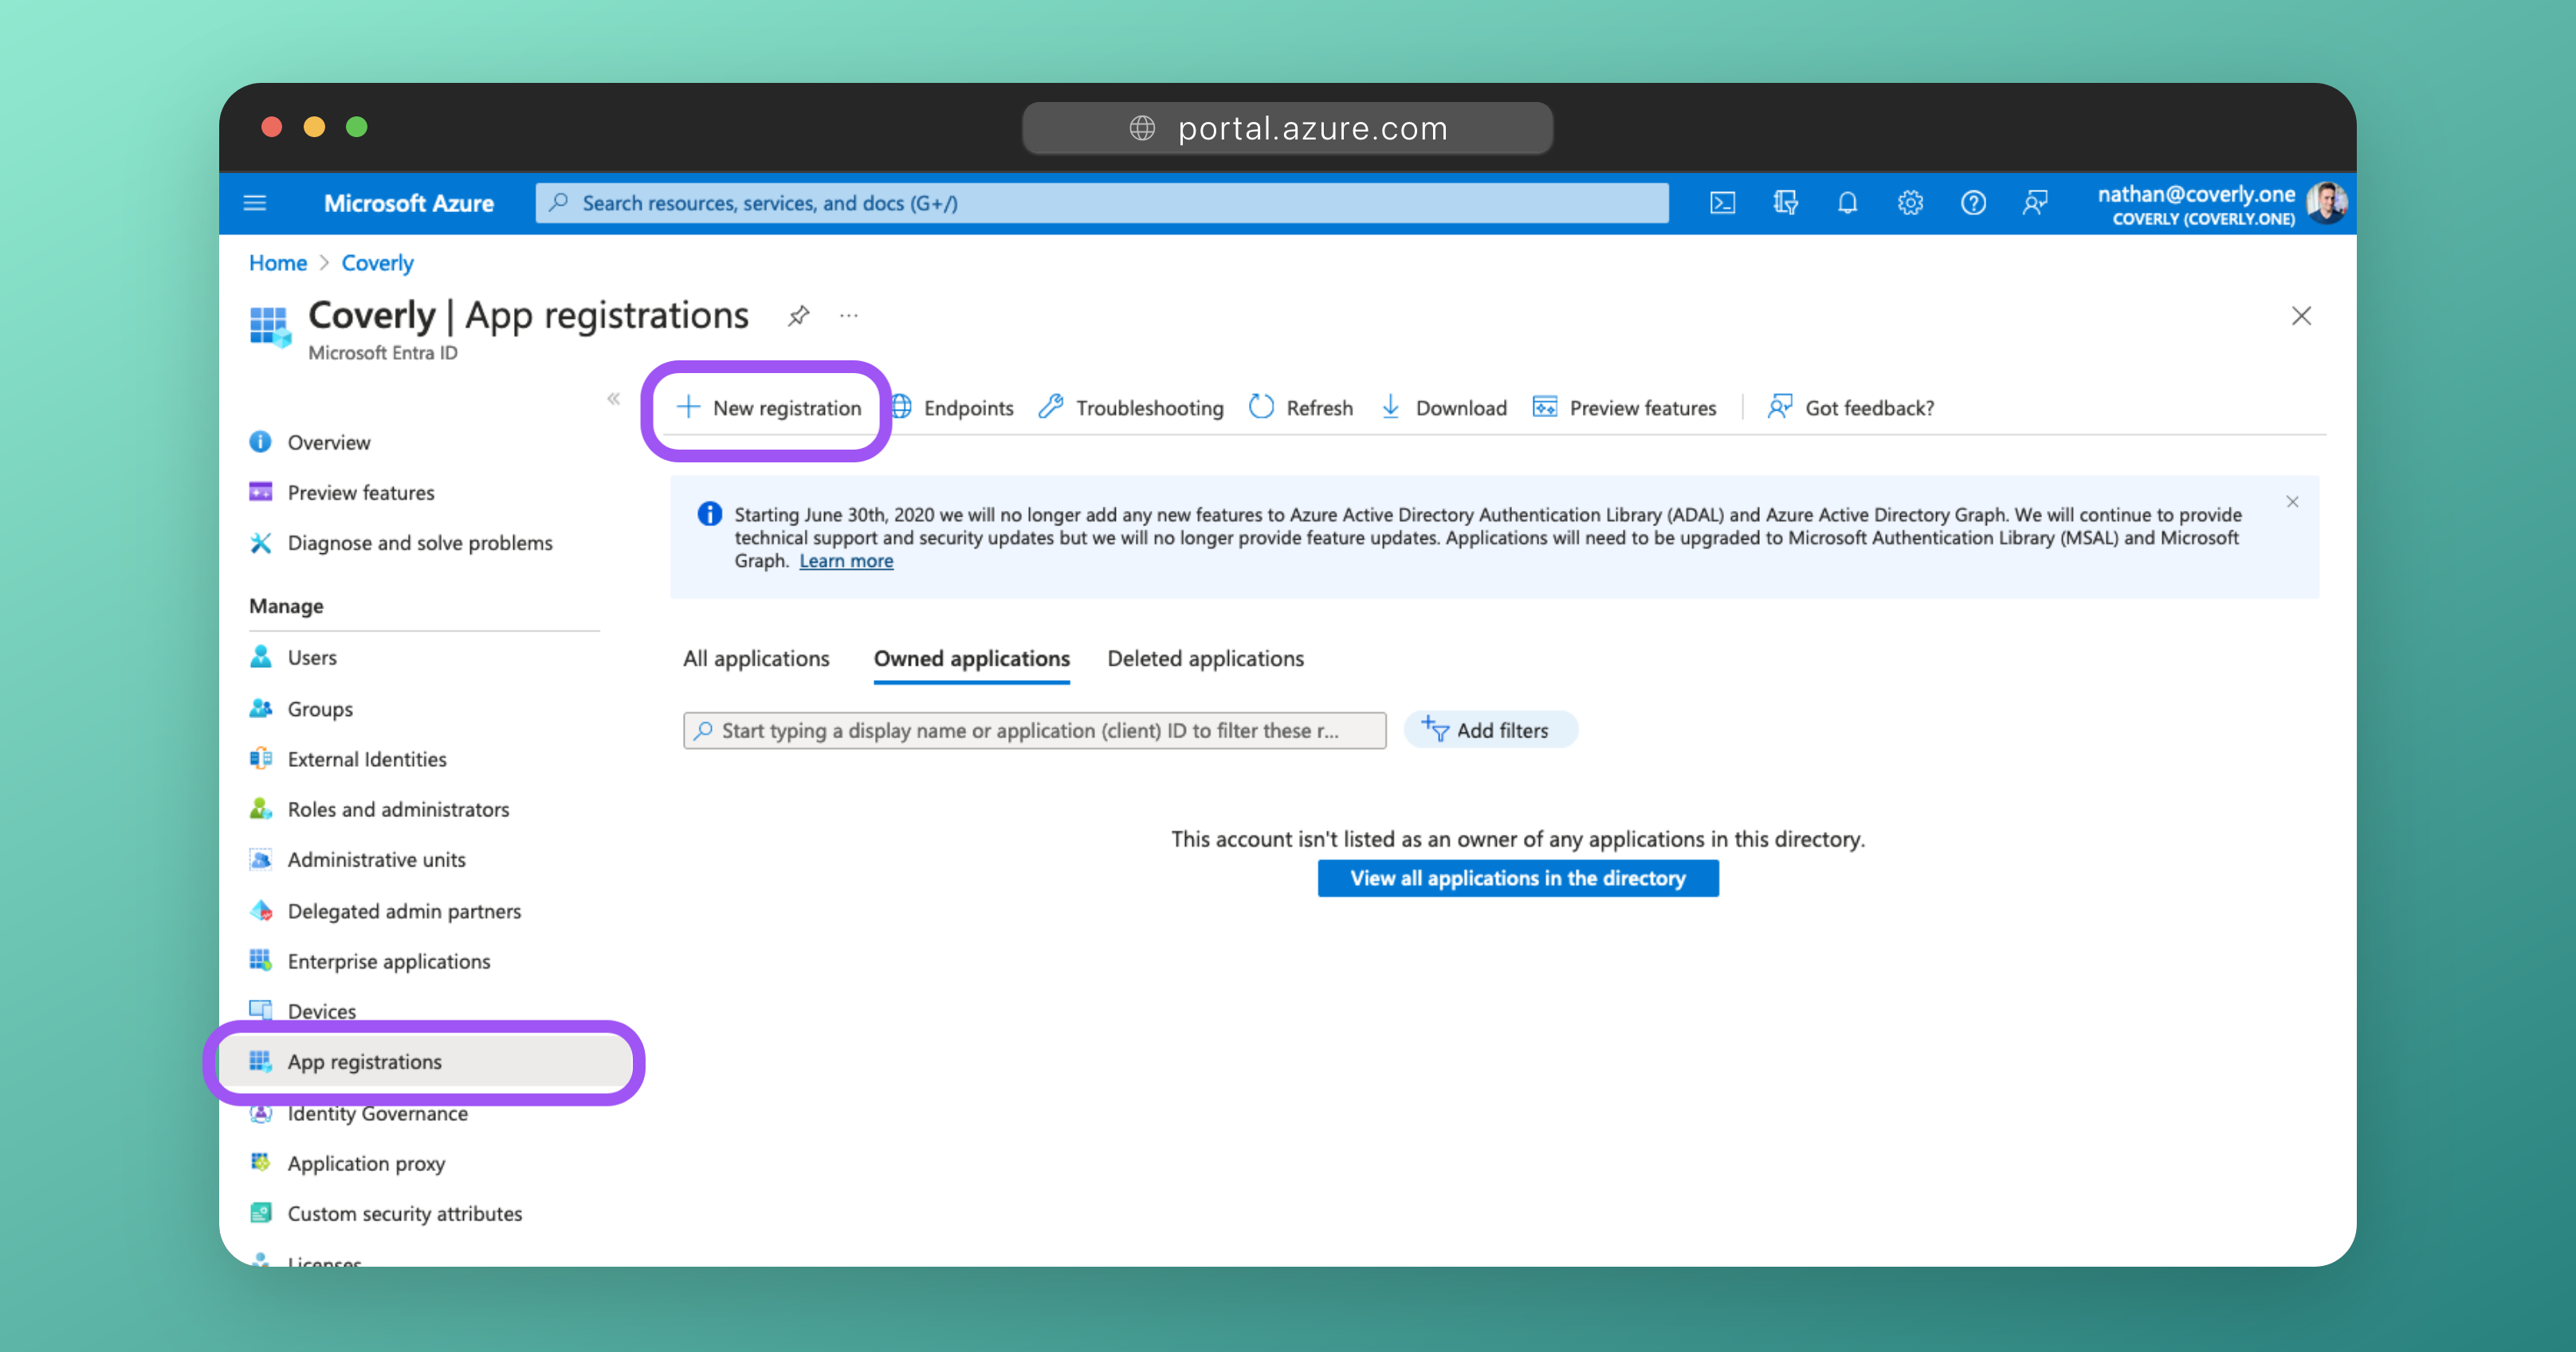
1 - Create a new App Registration
-
Sign into the Azure portal. Select Microsoft Entra ID, then App registrations > New registration.
-
Create a new App Registration with the following details and then click Register:
Field Value Name Glean SharePoint Crawler - 1(can be whatever you like)Supported account types Accounts in this organizational directory only (Single tenant) Redirect URI (Leave this field blank) 
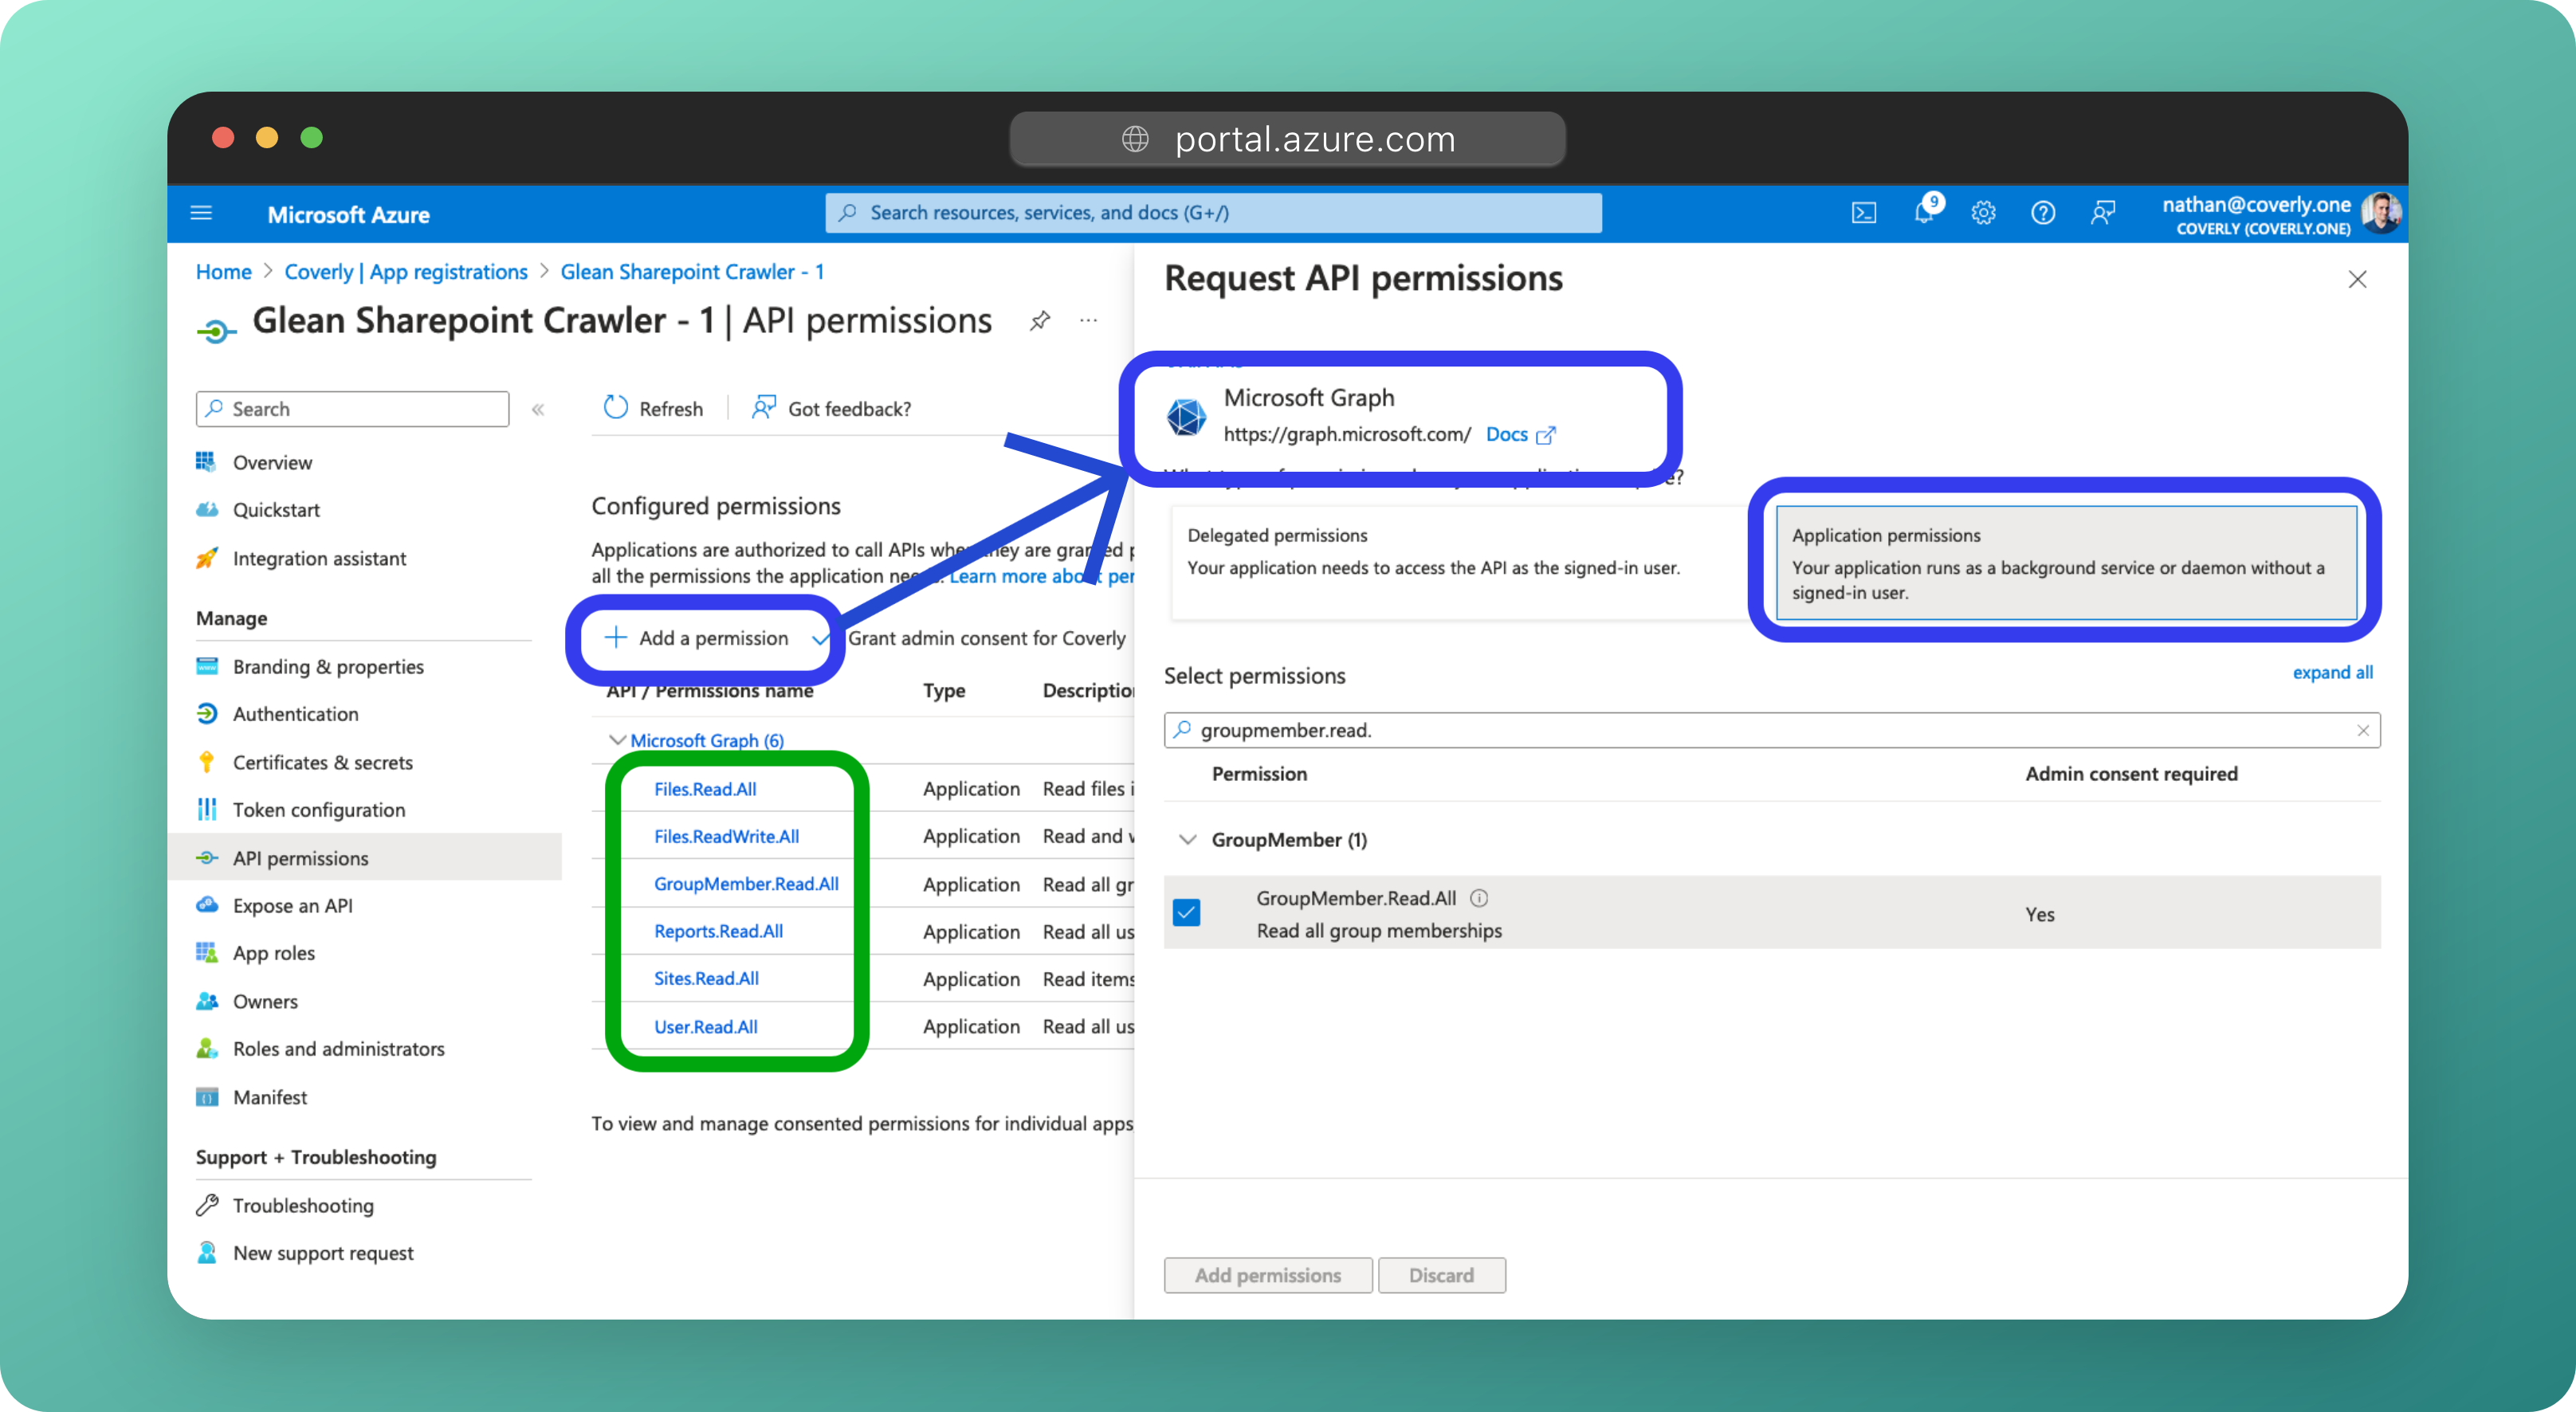
2 - Configure Graph API Permissions
-
On the left side navigation on the overview page, click on =API Permissions.
-
Click Add a permission and select Microsoft Graph. Choose Application permissions and add the following as Application permissions:
Permission Detail User.Read.AllList all the users within the directory (used for permissions) GroupMember.Read.AllGet the members of a group (used for permissions) Files.Read.AllRetrieve items, metadata, and associated content from the item for the index. Files.ReadWrite.AllUsed to create and manage a webhook to subscribe to change notifications Reports.Read.AllUsed for search ranking signals, crawler validation, and infrastructure scaling. Sites.Read.AllRetrieve sites, metadata, and associated content from the item for the index. Deprecated permissions - No longer used
These permissions were used in previous versions of the Glean SharePoint/OneDrive connector and are no longer required.
Permission Detail Group.Read.AllList all the groups within the directory (used for permissions) Directory.Read.AllList all users within a tenant (used for permissions) Error prevention
All permissions must be applied as Application permissions.
If you use Delegated permissions, the connector will not be able to fetch content and the crawling will fail!
Error prevention
Make sure that you have applied all of the permissions listed above. If a permission is missing, crawling will fail!
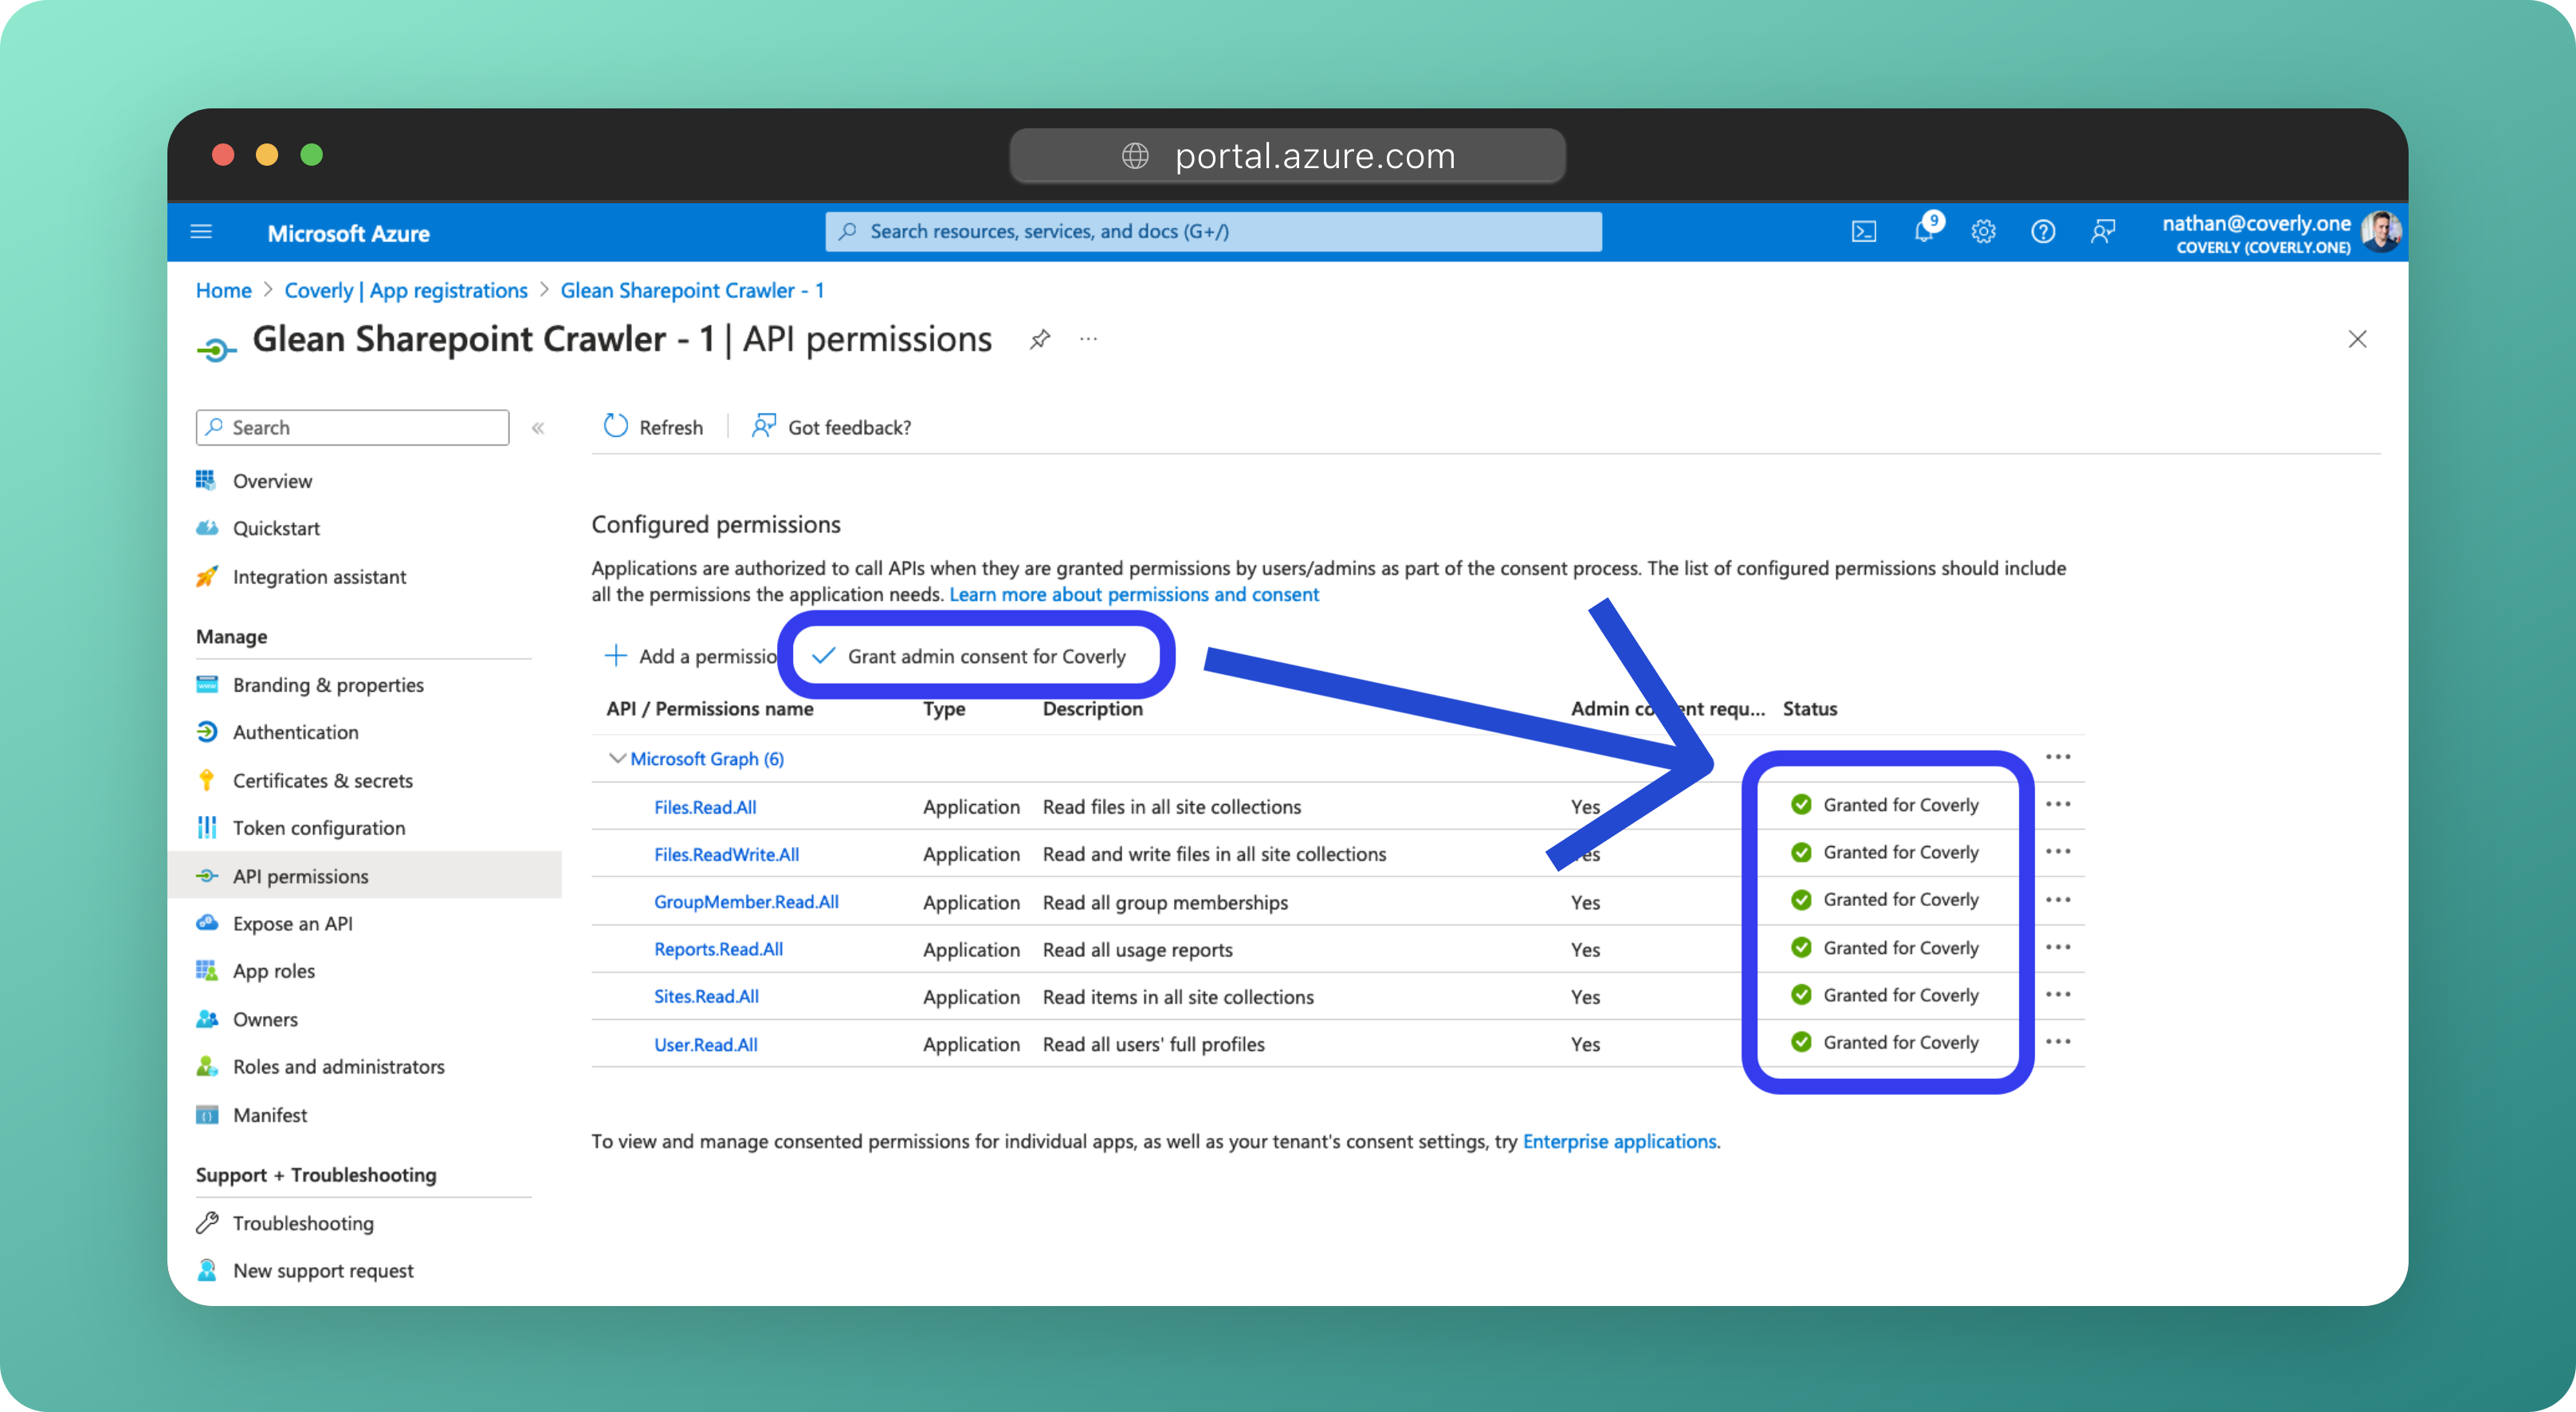
3 - Approve Permissions
As the above permissions use Application permissions, they must be approved by a Global, Application, or Cloud Application Administrator.
-
Ensure you are signed into Azure as a Global, Application or Cloud Application Administrator.
-
Navigate to the App Registrations > Glean Sharepoint > API Permissions.
-
Click the Grant admin consent for [company] button, followed by Yes to grant admin consent for these permissions.
4 - Generate a Secret
-
From the left sidebar, click on Certificates & secrets, then New client secret.
-
Enter a description, e.g.
Glean SharePoint Secret, select 24 months for expiry time, and click Add.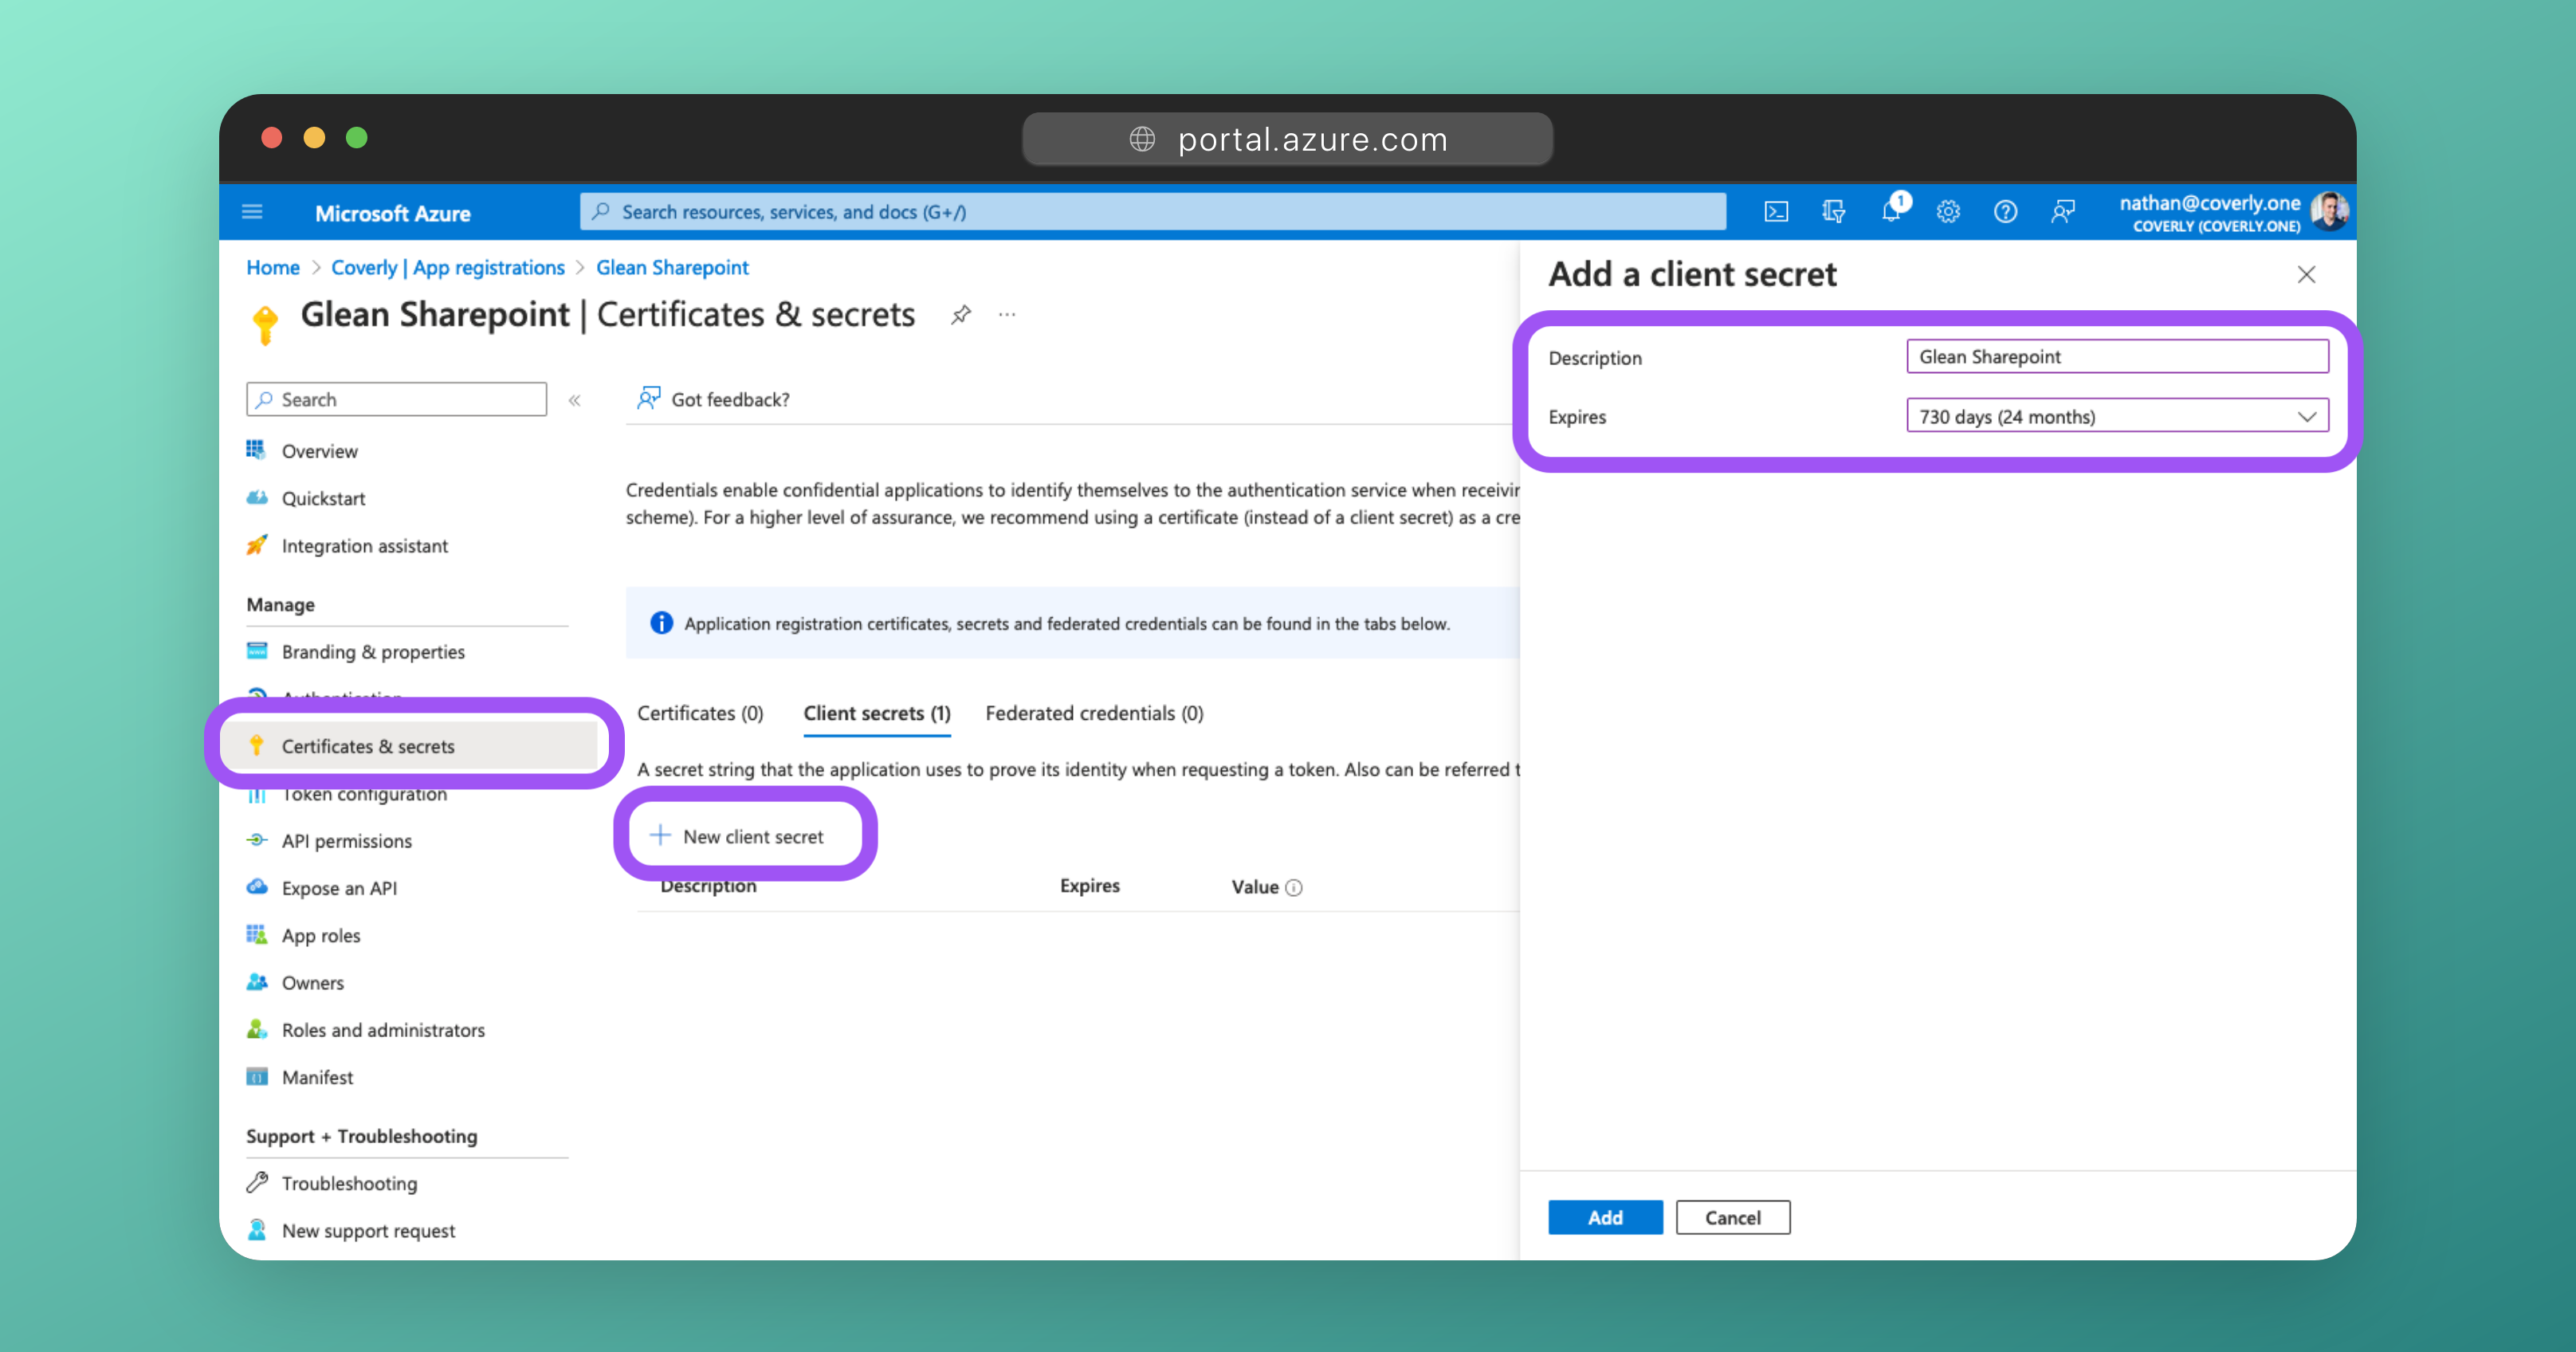
-
Under Client secrets, copy the Value (not the Secret ID) generated and enter it into the Glean Admin UI as the Client secret. The value will only be shown once.

5 - Copy the Application & Directory IDs
-
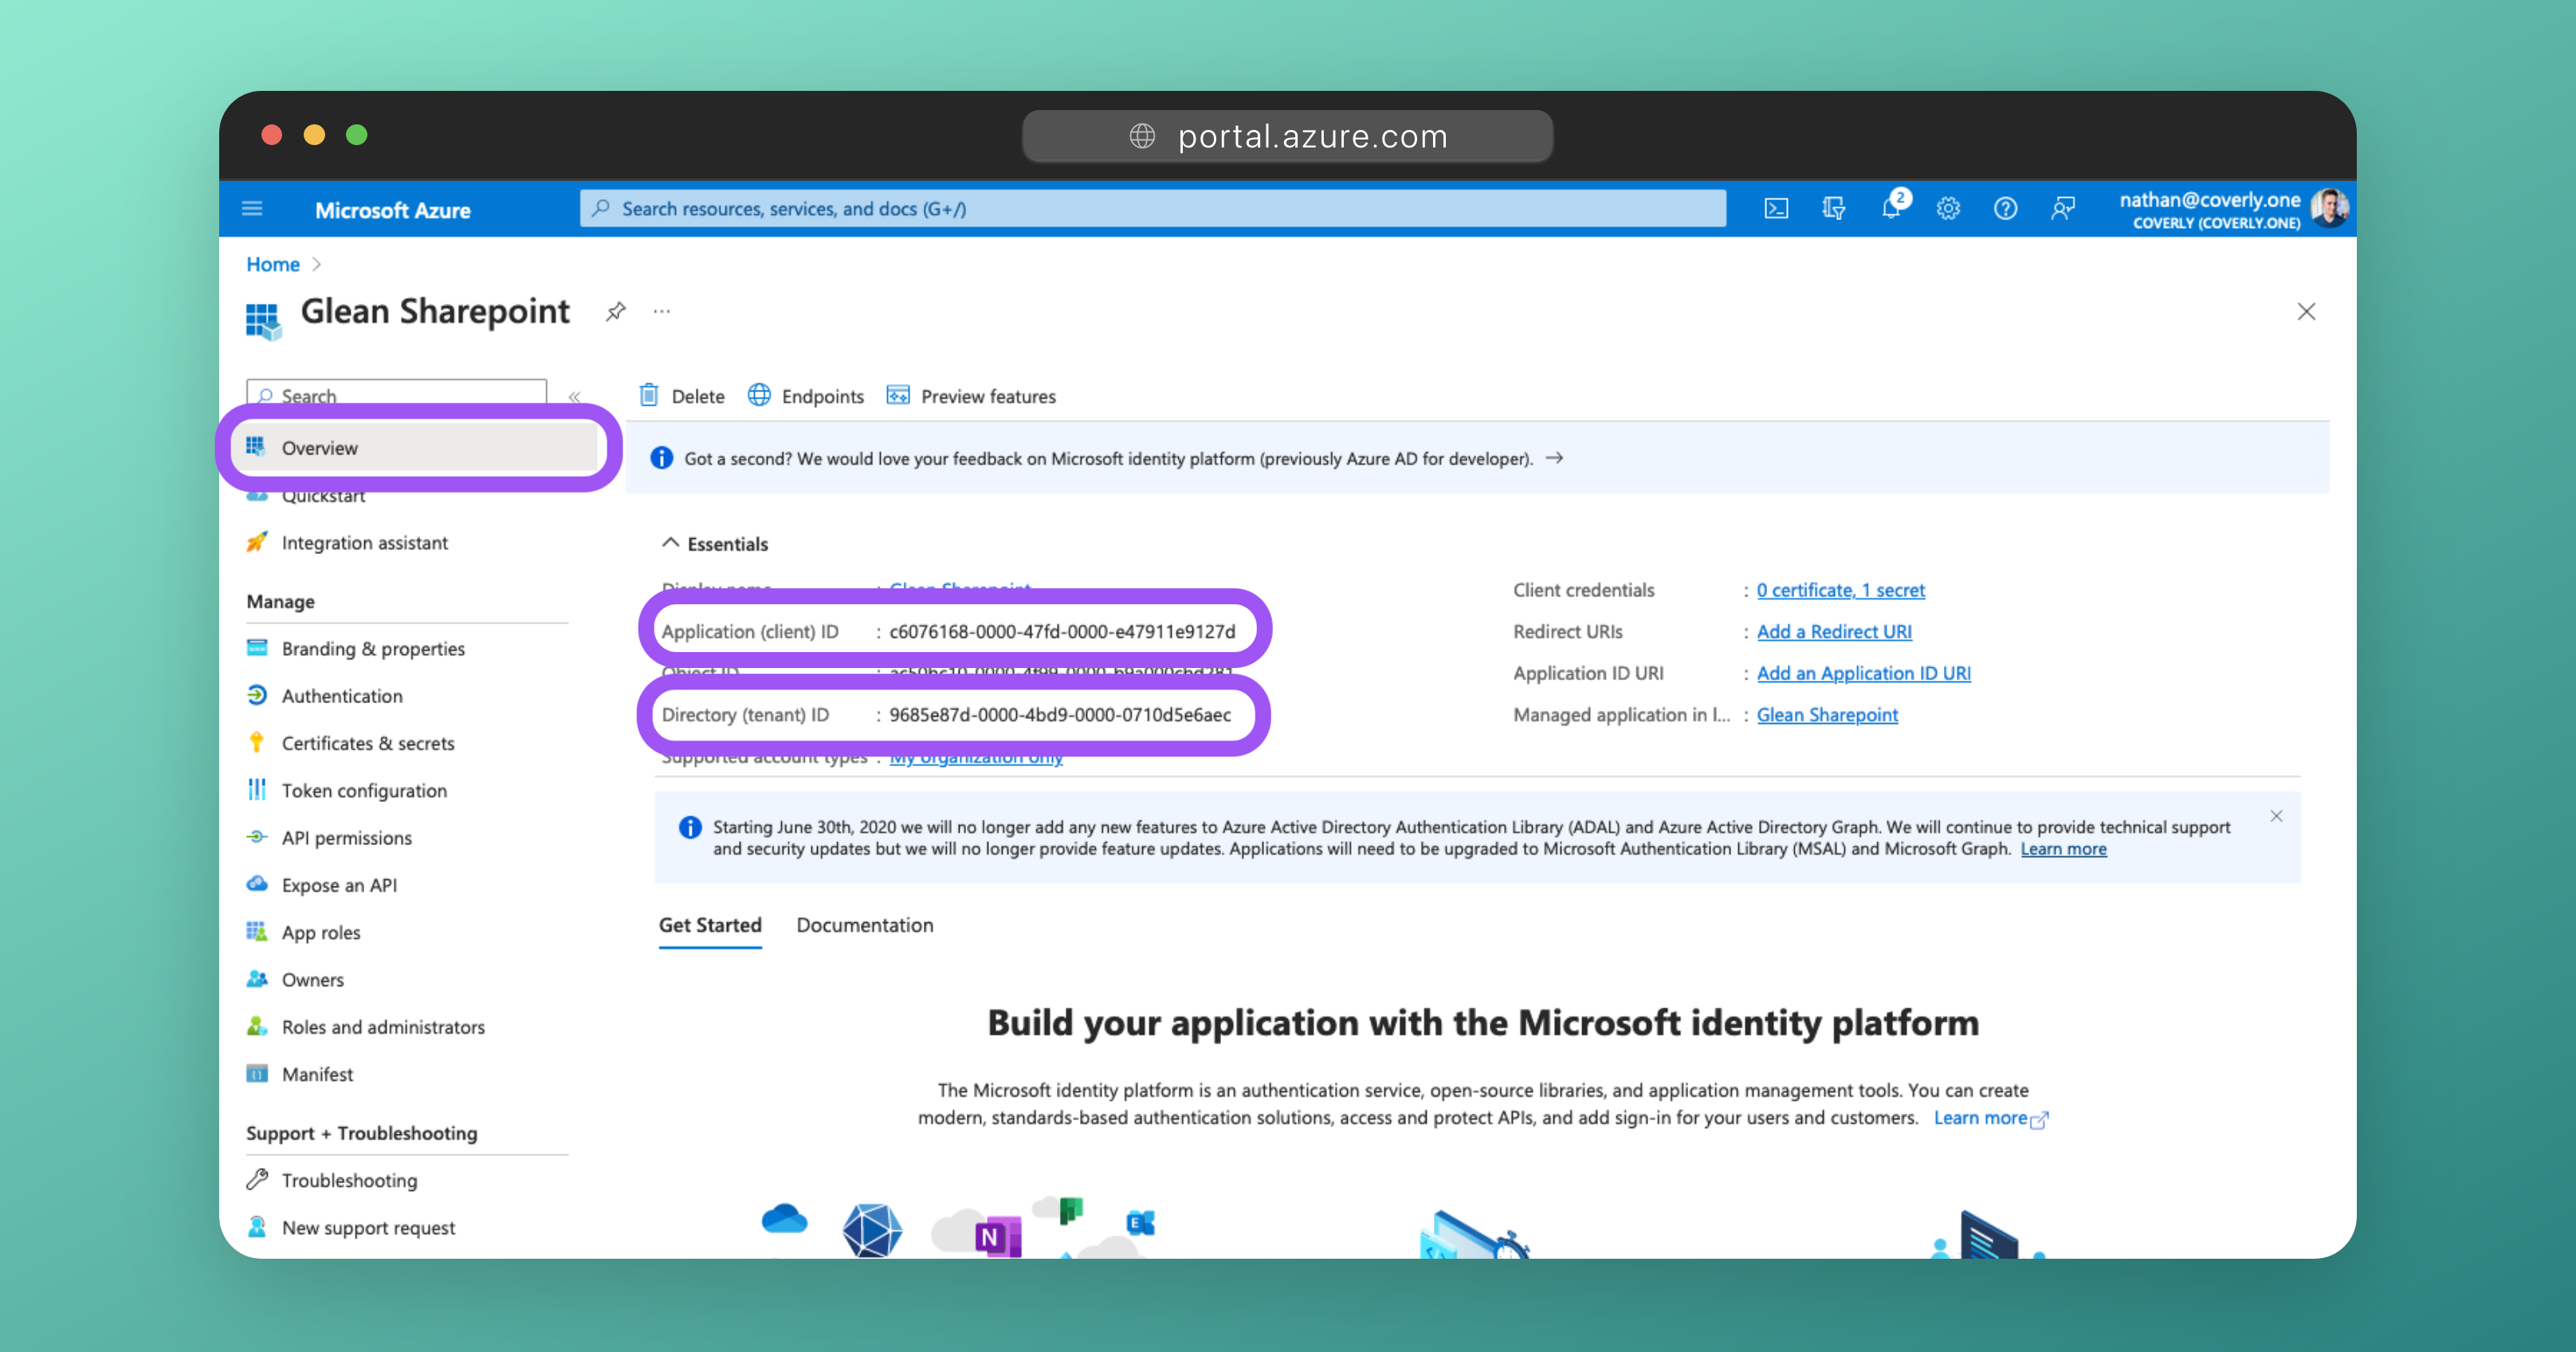
From the left sidebar, click on Overview.
-
Copy the values for Application (client) ID and Directory (tenant) ID. Enter these into the Glean Admin UI where indicated.
6 - Populate Credentials in Glean
-
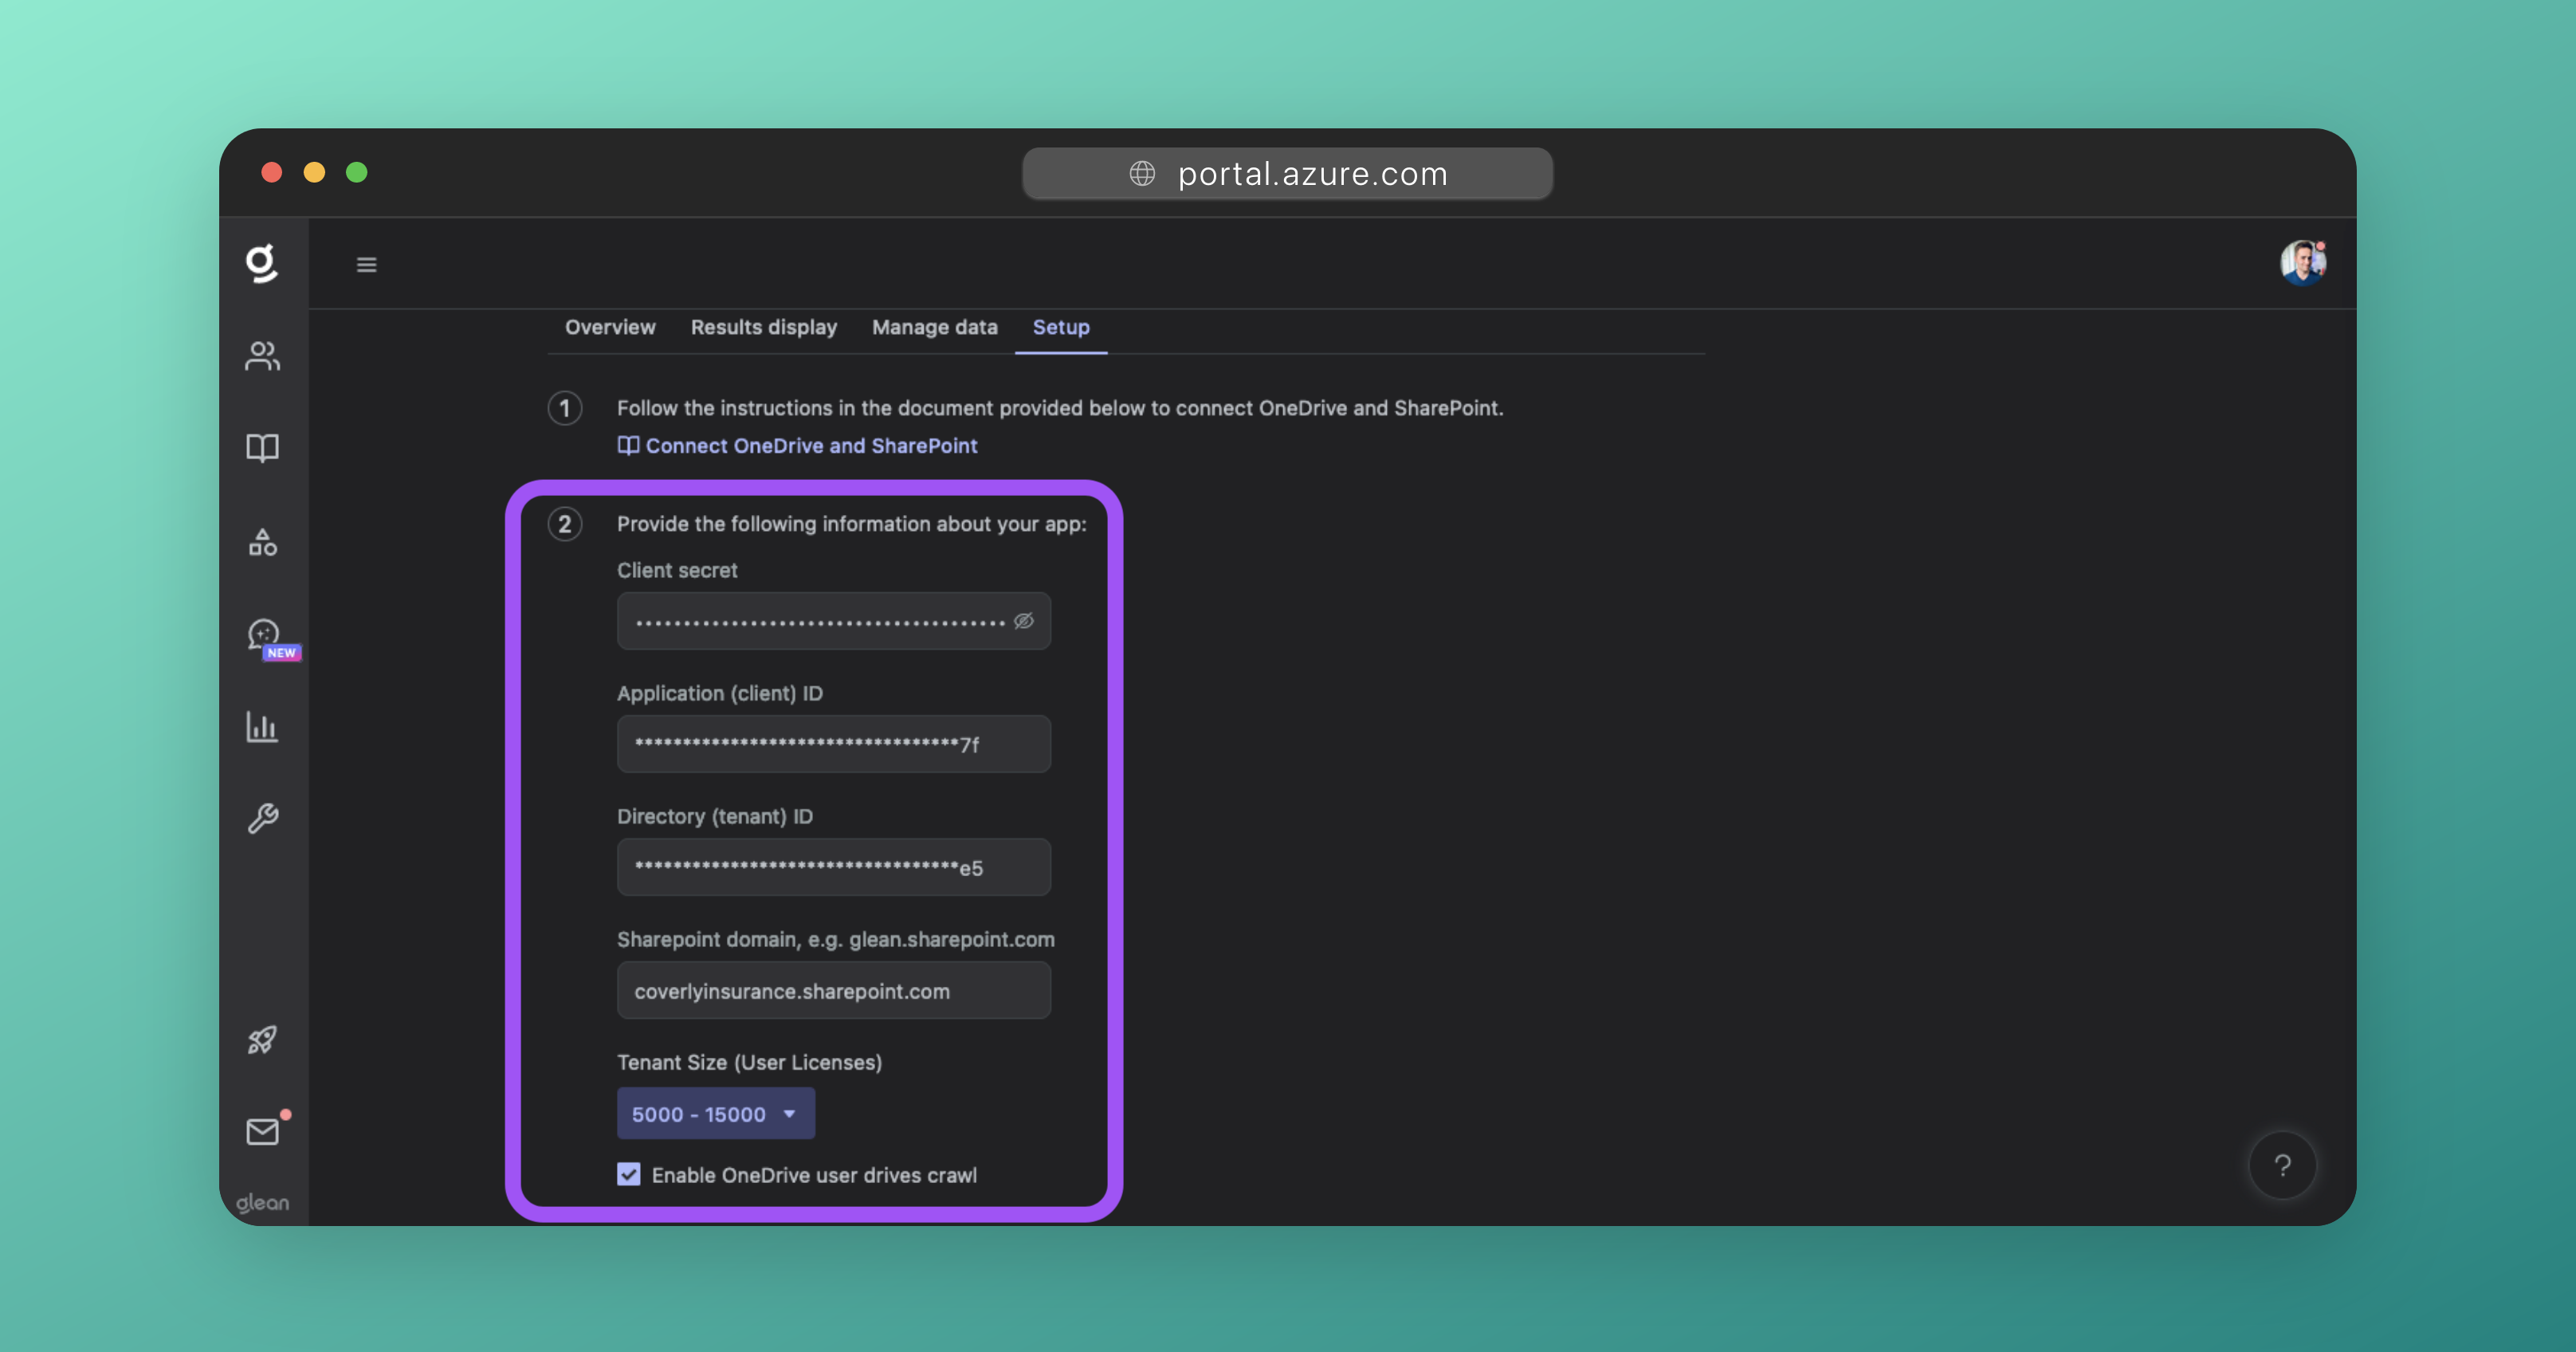
Ensure that the Client secret, Application (client) ID, and Directory (tenant) ID are populated in the Glean Admin UI.
-
Enter your SharePoint domain in Glean. Your SharePoint domain will be of the form
company.sharepoint.com. Ensure the full domain is entered. -
Set Tenant Size to the correct value based on the number of employees that your company has.
Warning
Tenant size helps Glean scale the crawler for your SharePoint & OneDrive instances correctly. Entering an incorrect size will cause your crawl rate to be slow.
-
Check the Enable OneDrive user drives crawl option to crawl OneDrive in addition to SharePoint.
7 - Add Additional Apps
SharePoint and OneDrive are often the largest sources of content for most organizations, however, the Microsoft Graph API tends to have a lower rate limit which is not ideal for crawling large amounts of content quickly.
To increase crawl speeds, you can repeat the steps above and create multiple "Glean SharePoint" App Registrations in Azure AD/Entra ID with the same permissions. When provided with the Application IDs and Client Secrets for these additional apps, Glean can utilize them in parallel to speed up the rate at which your SharePoint and OneDrive content is crawled.
Tip
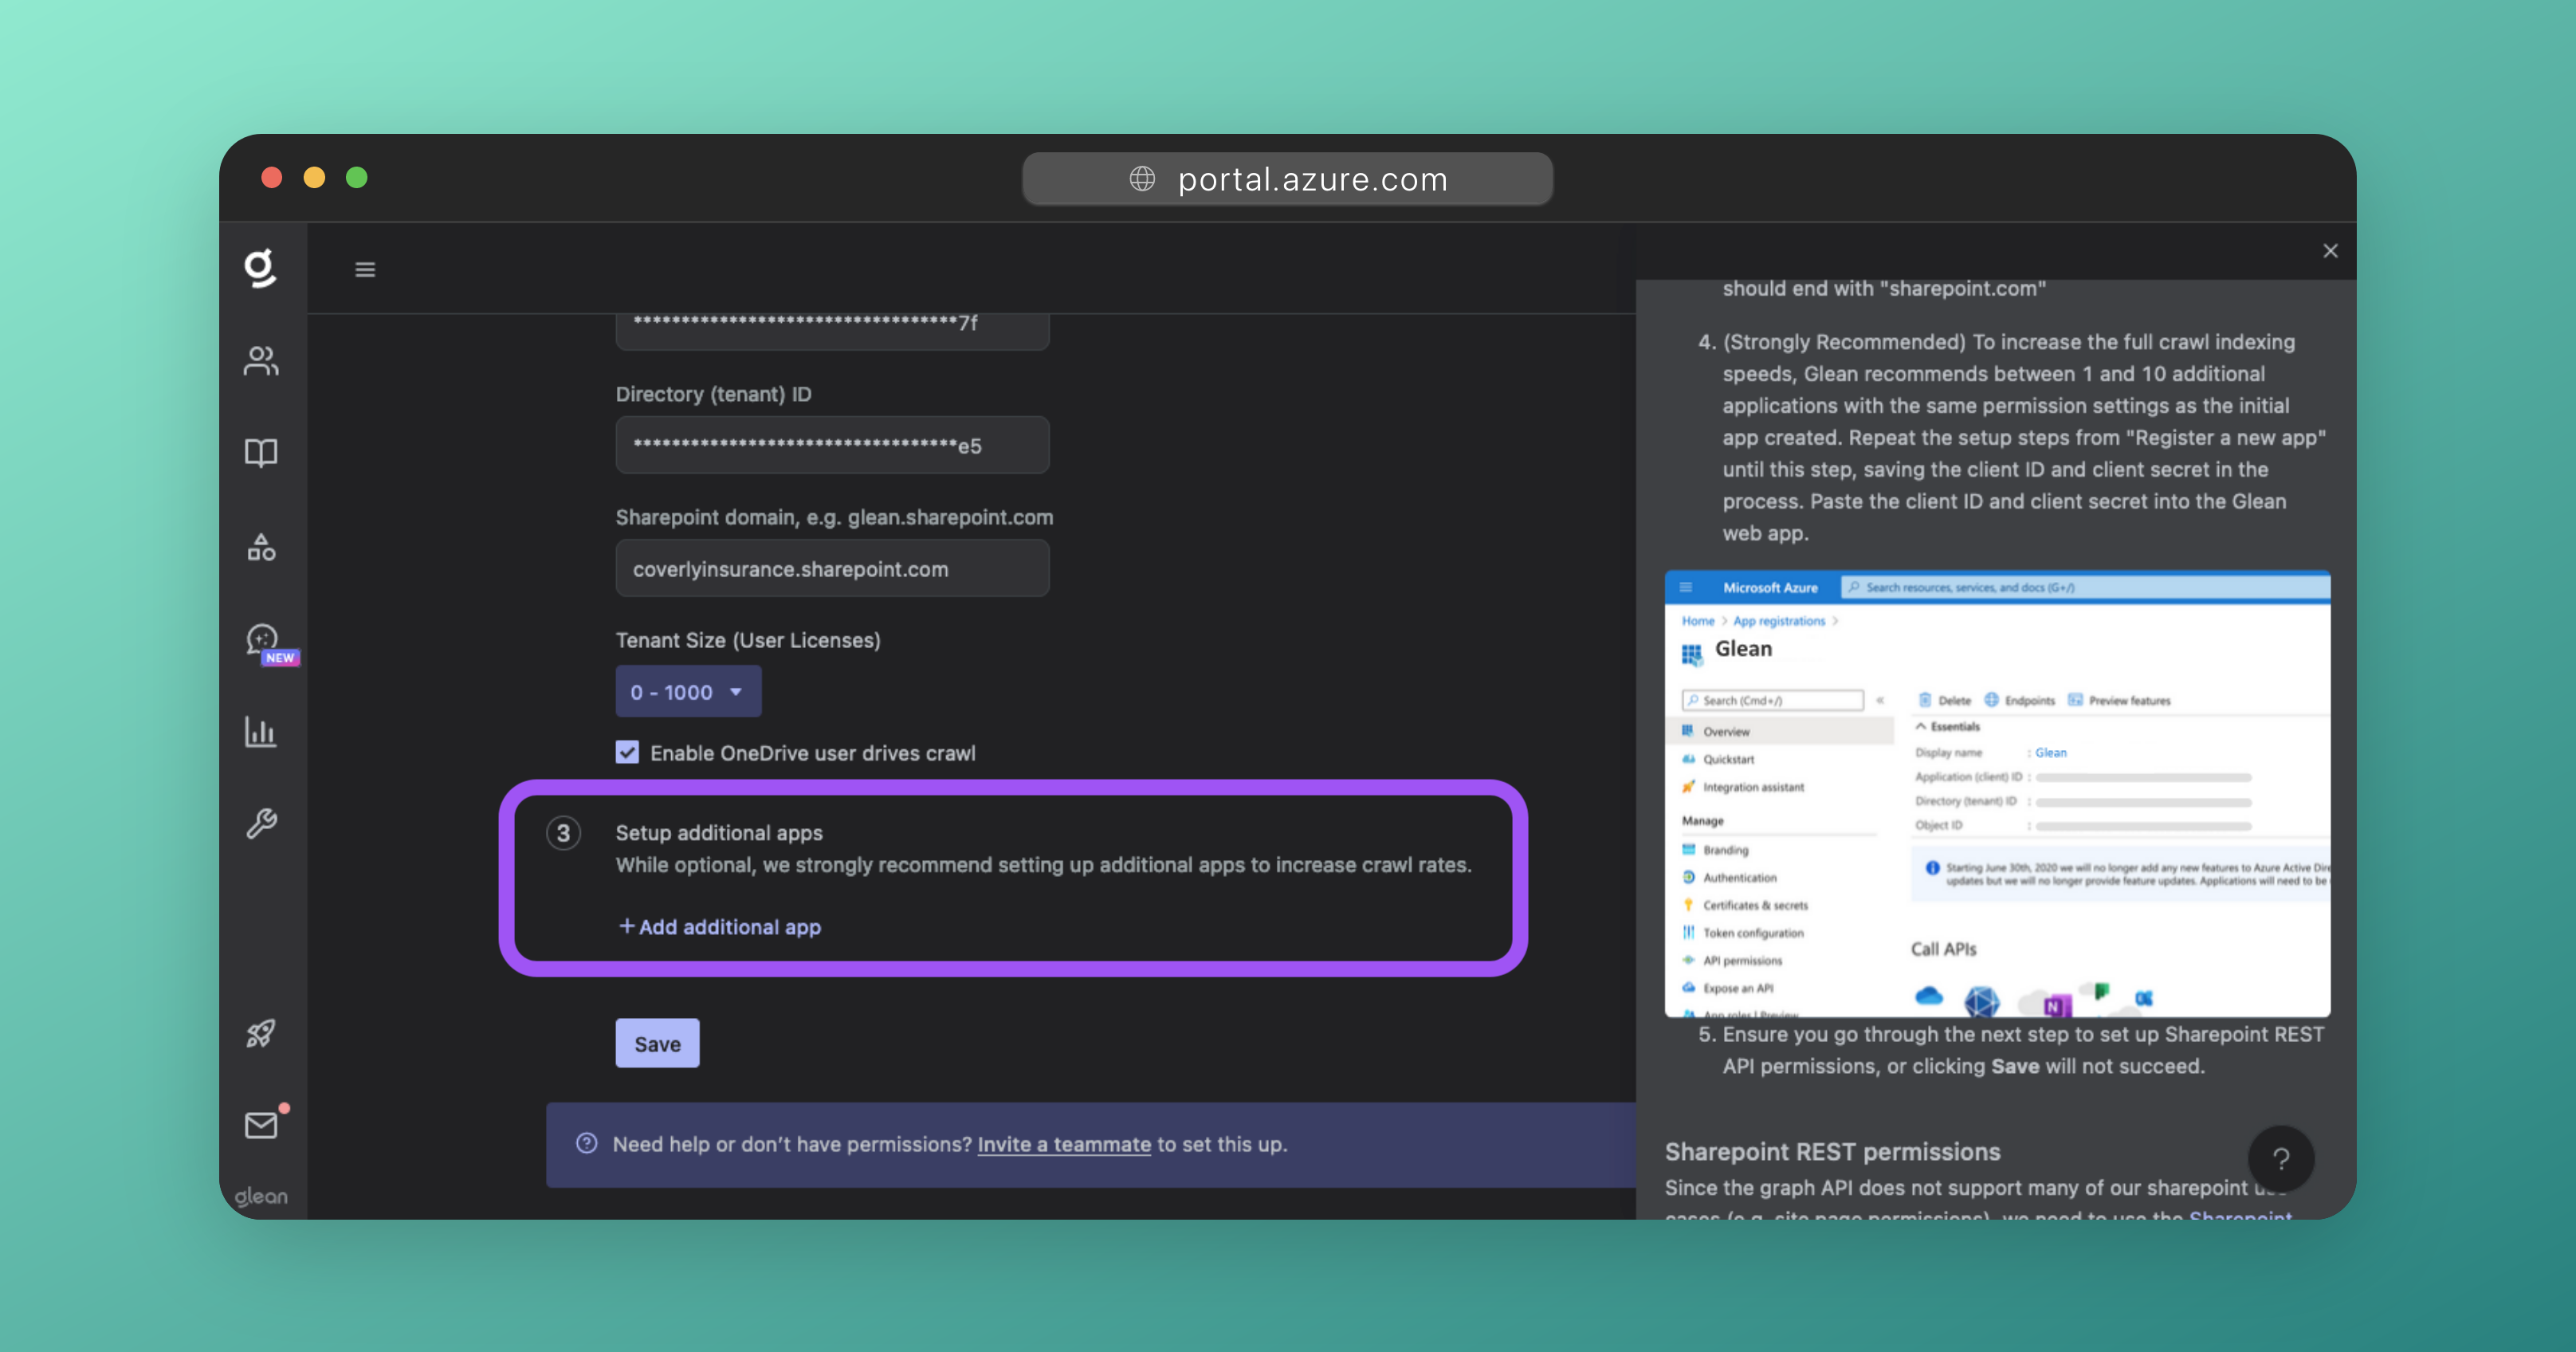
Glean strongly recommends that you configure between 3-5 additional applications, depending on the size of your organization.
-
In the Glean UI, under #3 Setup additional apps, click the Add additional app button. This will prompt you to add in another Application (client) ID and Secret.
-
For each additional app you wish to add, follow the steps above again:
- Create a new App Registration (e.g.
Glean SharePoint Crawler - 2,Glean SharePoint Crawler - 3, etc). - Add the correct permissions.
- Generate and copy a Client Secret key.
- Copy the Application (client) ID.
- Paste both the Client Secret key and Application (client) ID into the Glean UI.
- Create a new App Registration (e.g.
-
Once you have finished adding the details for the additional apps, DO NOT click Save just yet.
8 - Configure SharePoint REST API Permissions
Some SharePoint content (like classic sites, and permissions for site pages) is not obtainable from the Graph API, so Glean must use the dedicated SharePoint REST API instead.
Error prevention
You will need to follow this section to enable the SharePoint REST API permissions for each of the additional apps created above, or crawling will fail!
-
Navigate to:
Eg: If your SharePoint domain is<sharepoint-domain>-admin.sharepoint.com/_layouts/15/appinv.aspxcompany.sharepoint.com, go tocompany-admin.sharepoint.com/_layouts/15/appinv.aspx -
For every SharePoint app created (the parent app and all additional apps), complete the following:
-
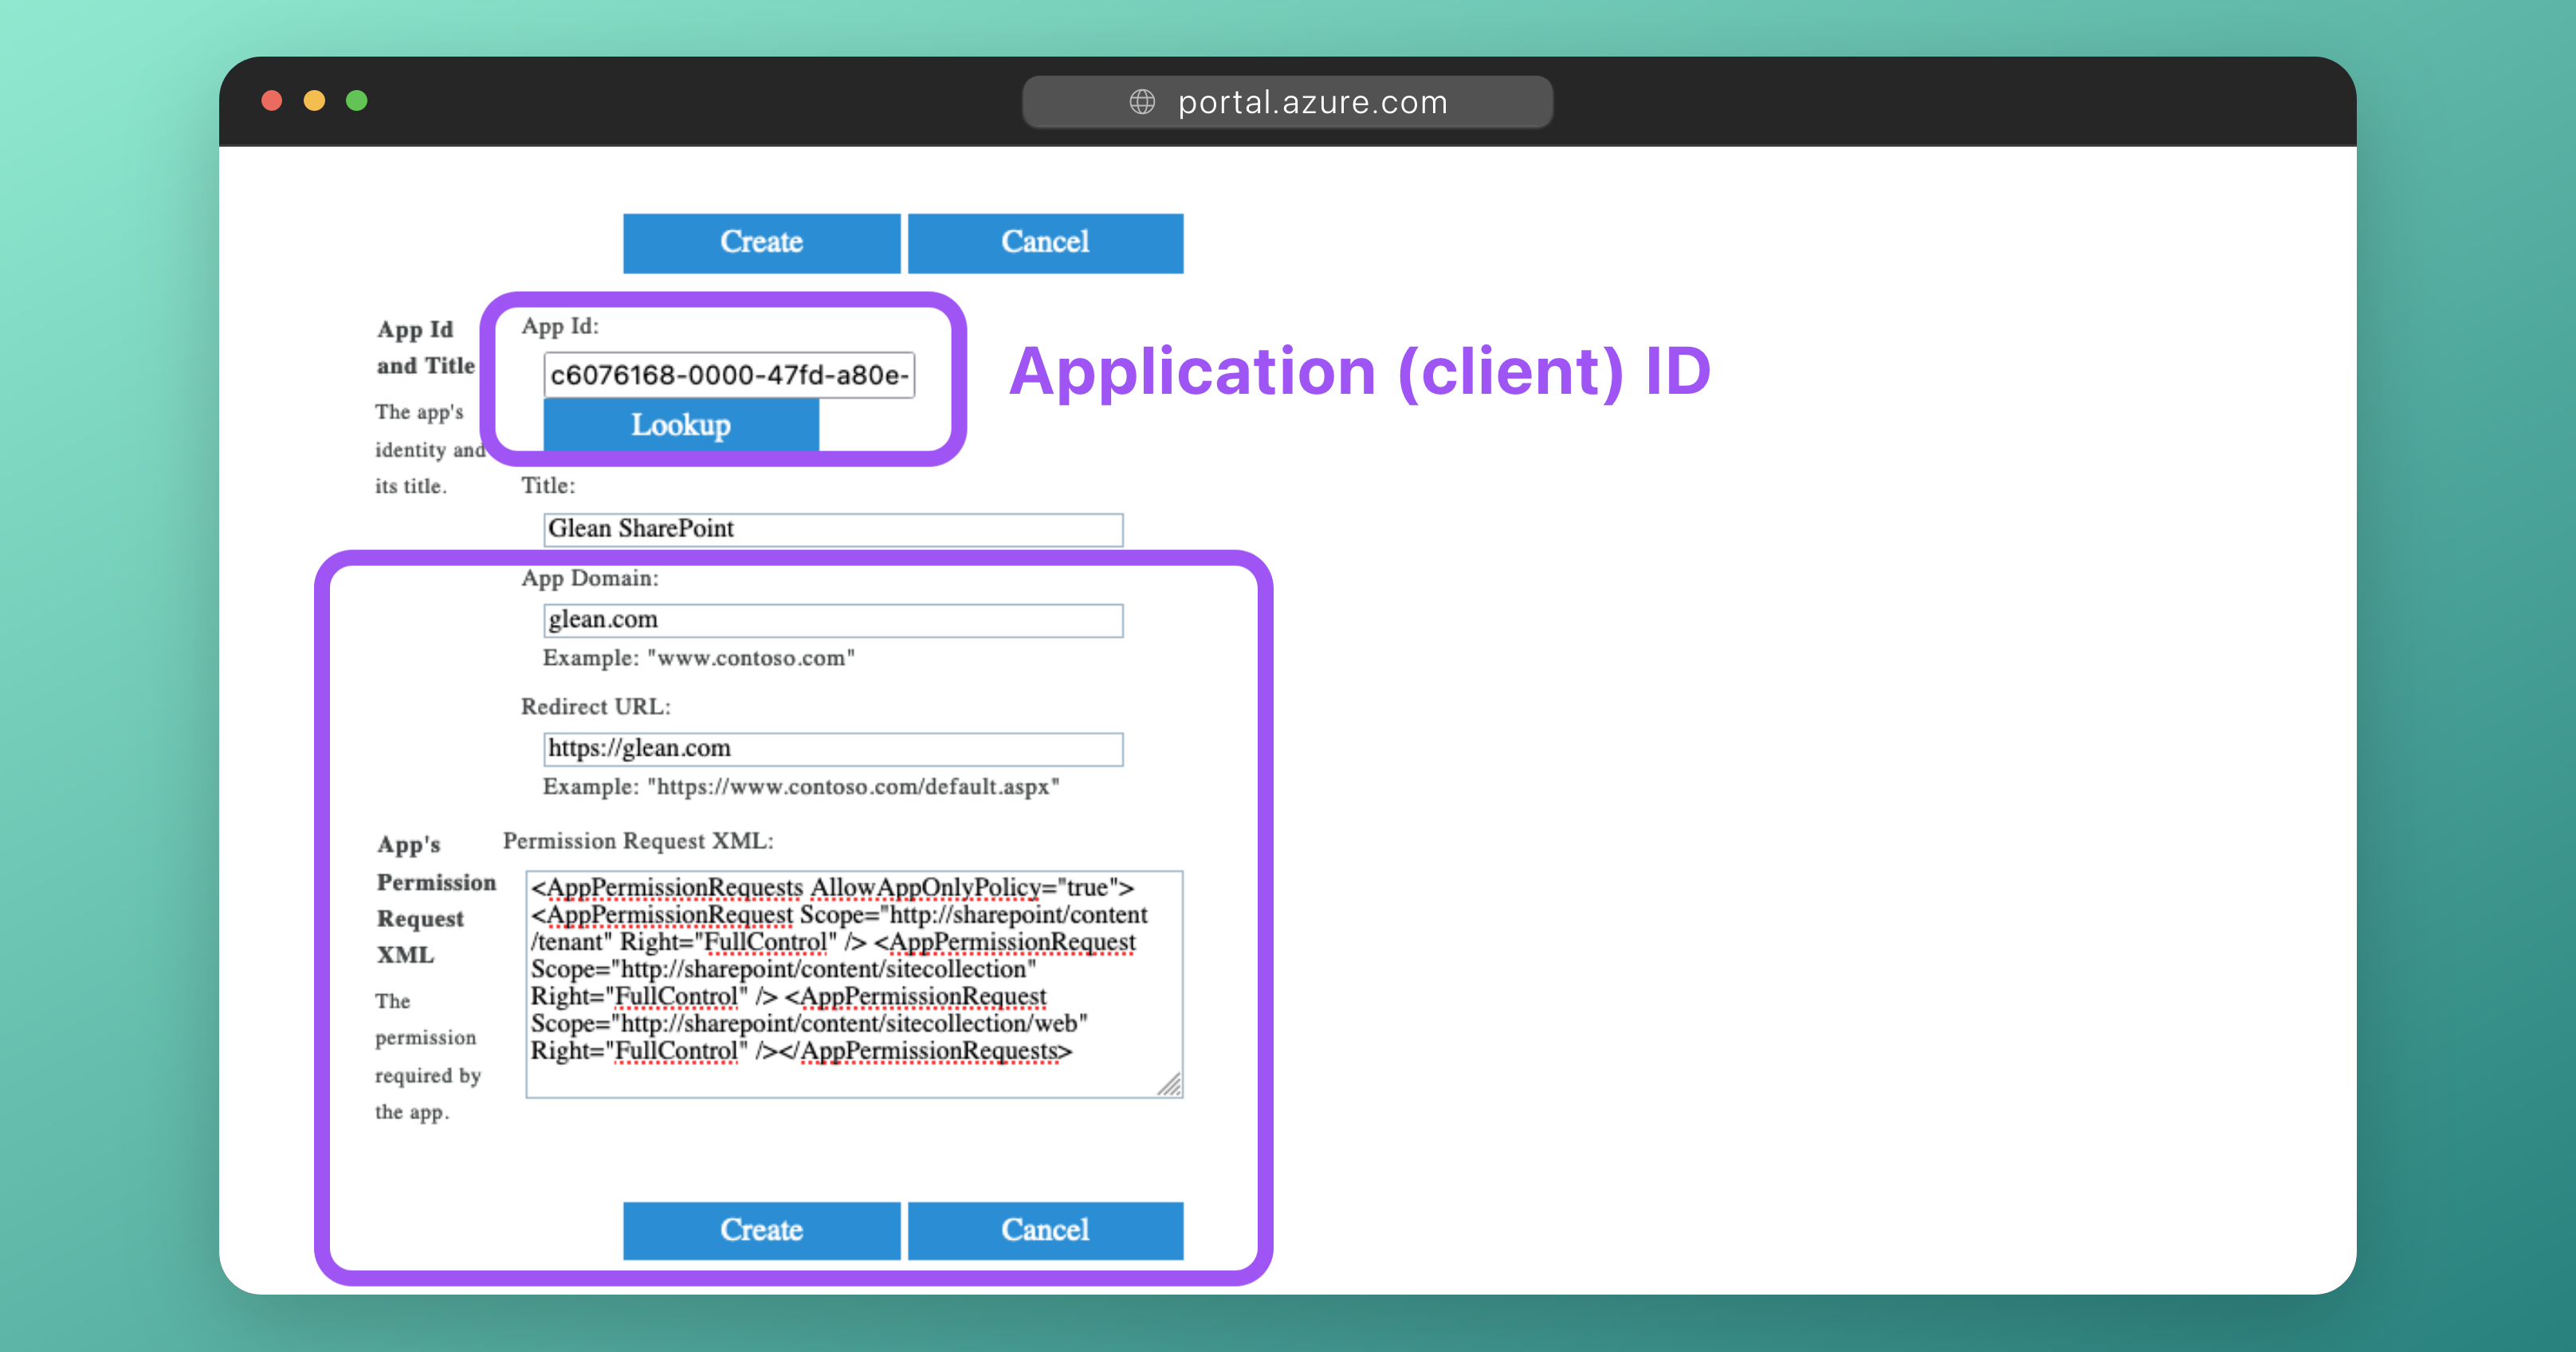
For App Id, paste in the Application (client) ID value and click the Lookup button. The Title field will automatically populate with the name of the associated App Registration (e.g.
Glean SharePoint Crawler - 1,Glean SharePoint Crawler - 2, etc) -
For App Domain enter:
glean.com -
For Redirect URL enter:
https://glean.com -
In the Permission Request XML field, paste the following:
<AppPermissionRequests AllowAppOnlyPolicy="true"> <AppPermissionRequest Scope="http://sharepoint/content/tenant" Right="FullControl" /> <AppPermissionRequest Scope="http://sharepoint/content/sitecollection" Right="FullControl" /> <AppPermissionRequest Scope="http://sharepoint/content/sitecollection/web" Right="FullControl" /></AppPermissionRequests> -
Click Create to apply the permissions.
-
Repeat steps a-e for each additional app.
-
Why is the FullControl permission required?
The FullControl permission are required to fetch role assignments and access permissions for each of your SharePoint sites (and their associated web components). The Graph API only exposes access permissions for Document Library items, hence the SharePoint REST API v1 must be used to obtain this information instead.
The SharePoint REST API endpoint responsible for returning this data requires FullControl as a permission of least privilege. If it is queried with any permission other than FullControl (e.g. read-only permission), the endpoint returns a HTTP 403 Forbidden response. Specifically:
{
    "odata.error": {
       "code":"-2147024891, System.UnauthorizedAccessException",
       "message": {
           "lang":"en-US",
           "value":"Access denied. You do not have permission to perform this action or access this resource."
       }
    }
}
This is discussed further in this StackOverflow post.
If Microsoft were to fix the SharePoint REST API (v1) endpoints used by Glean to correctly respond when read permissions are used, OR when Microsoft brings the Graph API inline with the data that can be pulled from the SharePoint REST API v1, Glean will deprecate the use of the FullControl permission.
9 - Validate Settings
Back in the Glean UI, click Save. Glean will now validate that the required permissions for each Glean-SharePoint app have been granted.
Error: Unable to fetch O365 Sharepoint site groups.
Depending upon the age of your SharePoint Online tenant, you might receive the following error:
Unable to fetch O365 Sharepoint site groups. Please check that the sharepoint/content/sitecollection scopes are enabled with FullControl for Sharepoint REST API.
This is normal!
If your SharePoint Online tenant is newer (typically 2020 onwards), then the method of authenticating to the SharePoint REST API (Azure Access Control Services (ACS)) is disabled by default. This was enabled by default in older tenants to assist with migration from SharePoint on-premise.
To use the SharePoint REST API, you need to enable ACS. You can enable ACS using PowerShell:
-
Install the required modules (PowerShell 7.2+ is required):
Install-Module -Name PnP.PowerShell -RequiredVersion 2.4.0 Install-Module -Name Microsoft.Online.SharePoint.PowerShell- You can check the latest stable version of the PnP.PowerShell module here.
- The default version of PowerShell that comes with Windows 10 and 11 is PowerShell 5.1. You can install PowerShell 7.X alongside PowerShell 5.1.
- To check your PowerShell version, run the
$PSVersionTablecommand in PowerShell and review the version next to thePSVersionfield. - Microsoft have installation (and migration) instructions located here.
-
Connect to your SharePoint domain:
Connect-PnPOnline -Url https://<sharepointdomain>-admin.sharepoint.com -Interactive- The
-Interactiveflag will open a browser window for you to authenticate using SSO. This allows MFA to be used.
- The
-
Enable ACS:
Set-PnPTenant -DisableCustomAppAuthentication $false-
You can check the status of this flag at anytime by using the
Get-PnPTenantcommand:PS /Users/username> Get-PnPTenant [...snip...] DisableCustomAppAuthentication : False [...snip...]
-
-
Attempt to click Save again in the Glean UI. Your settings should now validate successfully. DO NOT start crawling just yet.
10 - (Optional) Apply Crawling Restrictions
Glean will fetch all data in SharePoint by default. You can set restrictions in Glean to prevent data from showing in search by:
- Excluding certain content from being crawled.
- Set only specific content to be crawled.
You should apply crawling restrictions (if required) before starting the crawl in the step below.
More information: M365 - Restricting Content
11 - Start Crawling
Click on the Overview tab, and when prompted, the Start Crawling button to begin indexing your organization's SharePoint content.
Success
You have successfully connected SharePoint and OneDrive to Glean!
You can check the status of your crawl by navigating to Workspace Settings > Setup > Apps, and examining the Items Indexed, Crawler, and Crawling status fields.
Depending on the amount of content in your SharePoint and OneDrive environments, crawling can take anywhere from 24 hours to 1 week to fully complete.